photography digital information

My interview with Kevin Kubota...

I have had the pleasure of playing with goodies from Kevin (Lightroom 2 Training DVD & his new Lightroom Speedkeys) and have just signed up for his 2 day workshop at the Sugarbush Resort in Warren Vermont this coming October.

Being a big fan of his products and his work you can imagine how excited I was to have Kevin take the time to do an interview with Weekly Photo Tips!

So, without further delay, ladies and gentlemen, Kevin Kubota...


1. When/how did you get into photography?

I started as a teen. My dad was a very talented photographer - always photographing our family in natural B&W images. Being the first born, I got all the photo attention. My younger sister is still scarred from an un-balanced picture archive in my favor. (not really :-) My dad had his own darkroom through college and photographed for the school paper. I took a photo class in high school and learned darkroom tech myself. He let me use his Nikkormat camera (yes, this was before digital) and that actually stayed with me and carried me through my first professional photo jobs - until it was stolen while I was on a location shoot. I was very broken up over that.

I finally started doing photography professionally after my first career in Fashion Design fizzled out and I was working at Nordstroms, selling shoes, and looking for something creative to do for a living. My roommate asked me to do some photos of her for her boyfriend, and so I put together a make-shift studio in my garage and gave it a shot. The images came out pretty good, and soon word-of-mouth brought me paying clients. I got in to weddings soon after I had my own wedding photographed, and I became friends with my photographer.

2. Who (or what) had the most influence on your development as a photographer?

Other than my father, who I know instilled my love of photography from an early age there were 3 people. My mom, because when my dad's camera was stolen she offered to buy me a "real" new camera. I was broke and could not afford it myself. If that hadn't happened, I may have taken on another job to make money and who knows if I would have returned to photography as a profession. Then, my personal wedding photographer, George Carranza. He's still a wedding photographer in So. California and has been one of my best friends. He encouraged me to get in to weddings and was always 100% open to sharing everything with me. I learned a lot about the business of photography from him and his art is awesome. He does amazing fashion and commercial work, as well as weddings & portraits. Then, there was a commercial photographer named Chuck Shahood in So. Cal. He taught at the local college where I took a few photo classes. He offered me an assistant job in his commercial studio and I grabbed at it. He was a brilliant photographer, crazy about the little details and quality control. He taught me lighting, got me in to computer imaging, and instilled a sense of "shoot for perfection" in me. He also loved to help and share with me, and I grateful for that.

3. What was your "big break"?

One day, sitting in my home office in the back of my garage in Bend, OR, I had a thought. I was going to finally break out of my comfortable box and submit images to a photo magazine. I used their online submission form and then put it out of my mind - expecting no reply at all. The next day, I got an email from them and they wanted to feature me on the cover of their next issue! I was blown away and couldn't really believe it. Soon after, they called and wanted to introduce me to some people at Nikon since I was doing wedding work with Nikon's newly released D1 digital camera. Nikon liked what I was doing and asked to feature my work in an upcoming advertorial. Soon they asked to include me on their "Legends Behind the Lens" website - the 2nd photographer to be featured after Joe Buissink - which I considered a great honor. Before I knew it, they had asked me to speak on their behalf at WPPI.

4. Why do you shoot Nikon?

Well, I definitely have a nostalgic connection to Nikon cameras from my father. But, over the years, I've been fortunate to be able to try most every camera on the market and run them through their paces. Part of the reason for my success is my constant search for "a better way". I'm never satisfied unless I feel I'm using the best of something - cameras, software, computers, workflow, business techniques, etc. I've always felt that Nikon cameras focused (pardon the pun) on intuitive, useful features and ergonomics more than any other manufacturer. I liken them to Mac in some ways. They may not come out with "upgrades" as often as competitors, but when they do, there are great innovative features. They were the first pro SLR with Auto ISO, a feature I absolutely love. The first with customizable function buttons, another feature I use all the time. Their flash systems have also been superior since the beginning of digital, and they still are. They just feel good in the hand as well. They feel like quality cameras, and I like that.

5. Which model do you shoot?

I use the D3 for my wedding and portraits and a D90 for travel. I love the light weight of the D90 and the video. I'll be trying a D300s soon, which might replace my D90. The D3 is perfect for weddings and portraits. It's ultra fast, focuses quick and accurate, and the high ISO quality is amazing. It's a perfect low-light camera. 12.1 MP is perfect too. I really don't want any larger files. It's complete overkill for what I do and just a waste of time and storage space.

6. What is your favorite lens?

Hmm. that's a tough one. I have 4 that I use on every wedding: 70-200 F2.8 VR, 14-24 f2.8, 50 f1.4g, and my Lensbaby Composer. I think the 50mm is probably the all-around most useful.

7. What is your favorite shooting (off camera) accessory?

That would be my 45" Photoflex diffusion disk. I use this all the time. It's great for diffusing sun, creating soft bounce light, or shooting an off-camera flash through it. It's my most versatile tool and the one thing I'd take to a deserted island - along with my iPhone, of course.

8. RAW or jpg (and why)?

RAW all the way. Better dynamic range, overall quality, protection from over/under-exposure, and they don't take any more noticeable time to store or process. I think of it like in the film days - would I rather have negatives as my originals, or the printed proofs? If I was dead-on with my exposure and white balance all the time and I never shot in extreme contrast situations, then JPG would probably be fine and would save me some DVD storage, but I'm not. I shoot quickly and prefer to focus on my subject and timing. I like having the flexibility to fine tune my exposure and white balance later and know that I'll have the best quality image.

9. PC or MAC (and why)?

LOL. Mac, of course. I'll try to be objective here and not just gush about the ergonomic, beautiful, sexy, cool factor of Macs. In reality, I've used both over the years and the only way I've ever seen PC's with an advantage is in game availability and cheap hardware. Neither of which are important to me. When I teach hands-on workshops, I generally have about half Mac and half PC users. By the end of the workshop, after working side-by-side for a week, most of the PC users have vowed to get a Mac. They see the difference in stability and ease of use. Sometimes it takes working side-by-side like this to really appreciate the difference. I see it at every workshop and in my office where we do tech support for our software. By far, we have more problems and confusion from the PC users - and usually it's just with their operating system or hardware, not even our software. We do our best to help them out.

10. When did you make the transition from film to digital?

About 10 years ago. I started with a Kodak digital SLR. Very expensive, slow, and crappy - compared even to a $49 digital point-n-shoot of today. I knew, though, that digital was the future, so I completely embraced it and was committed from day 1.

11. What do you miss about shooting film?

Spending $1 on every shot I took. I love throwing money away.

12. If you had to pick one - Lightroom or Photoshop, which one and why?

Hmm. Which child do you save from a sinking boat? I guess if I had to choose, I'd stick with Photoshop. My workflow would definitely be slower, but at least I'd still have the final image quality that I'm used to - and my clients are used to. I just can't completely emulate the beautiful effects I do in Photoshop with Lightroom, and that's an important part of my style and my unique selling point.

13. It’s also obvious that you enjoy teaching, why?

I enjoy teaching, yes I do. I think there are a few reasons. One, my parents were both teachers and that rubbed off on me. Two, I feel blessed to have had other photographers and business people share with me and teach me, and I know how valuable that was (and still is) to me. Three, I get really excited when I see the light bulbs going on in my students heads. I love to see them transform and become even better at what they do. Four, I believe that at the end of the day, nothing matters more than knowing what you do matters (I'm paraphrasing somebody).

14. Photographically speaking, what is your proudest moment?

Honestly, it was at WPPI this year when I was honored with the Monte Zucker Humanitarian Award. It was a complete surprise too! My friends and staff all knew about it and conspired to get me to go to the awards banquet. When Skip Cohen called my name, I sat there in disbelief for a while until my wife and friends said, "Go up there! That's you!" To me, it epitomized what I really believe photography can be about: changing the world and making it a better place. No other photography award would have been nearly as important to me.

15. Of all the places you have shot, what was your favorite?

A secret old church in the hills of Tuscany :-) Not only is it photographically unique and stunning, but it's spiritual essence is completely real, unpretentious, and engulfing. I could shoot there all day, and I have.

16. Where would you like to shoot but haven’t yet?

Thailand. I also would love to get some amazing underwater images. I scuba dive, but have not put together a good underwater photo kit yet.

17. If you had to shoot just one kind of photography (portrait, wedding, etc.) what would it be?

For many years, I would have said weddings. I have always loved them, and still do. At this point in my life and career though - after shooting weddings for almost 20 years, I feel drawn to fine art photography. I used to thrive on the adrenaline and energy of a wedding, but I'm starting to really appreciate the zen and quietness of fine art - sitting, observing, taking in an essence of a place or thing before photographing it. I guess that could be applied to weddings as well - just a different approach.

18. When did you start “Kubota Image Tools”, how did that happen?

I started Kubota Image Tools about 8 years ago. I had been teaching workshops for a little while and showing people how to write their own Photoshop actions. I wanted to teach them to "fish". After a while, I realized that most people also realized that there was more to writing a good action than just knowing the steps. They had to have experience with PS to know how to best use each feature, layer, filter, etc. to get beautiful looks. People starting asking me to just sell them my actions, which I reluctantly started to do. It was a big hit, so we continued to develop and evolve them. We realized these tools, which we used ourselves to enhance our photography business, were helping others grow their businesses too. This gave us motivation to continue to develop other products to empower photographers.

19. If you could take your family anywhere on vacation, where would it be?

Ah, there are so many wonderful places on our list, but we always love going to our home town, Kailua, on Oahu. We love renting a beach house and just hanging out. My kids absolutely love it there and my wife and I can't ever get enough. We go there almost every year and never grow tired of it. It's just the most relaxing place on earth for us, and that's a high priority these days :-)

20. If you weren’t a photographer, what would you be?

My business card says I'm the "Idea Guy". So, it must be true :-) I love coming up with ideas for products, inventions, etc. I have notebooks full of stuff - most of which are not even photo related. I'd probably love to startup new businesses, make them successful, then sell and move on to others. I love the creation process and I feel I've gathered a lot of great business experience over the years as well.

21. Lastly, what is the one thing you would want people to know about Kevin Kubota?

That I am grateful. I feel very fortunate to have such wonderful people in my life and business. I appreciate all the kind notes and emails and I read every single one, usually twice. I never want to feel like I'm taking things for granted and I always want to extend the same support to others that I've received myself. I want people to know that I am truly happy when I help them to be successful too. That's ultimately what keeps me motivated each day.

Let me toot my own horn...

Four years ago I met Stacey Kane at a photographers meet-up in Portland (Maine) and being new to the world of photography, I was a bit in awe, it was kinda like meeting Tiger Woods at a golfing convention.

I had just gotten my first "real" camera and here I am sitting across the table from a woman who shoots celebrities, the rich, and the famous. She has been in People, Martha Stewart, In Style, The Knot, and has been asked to contribute to several photography books. So I was just a little excited when she invited me to stop by her studio and talk photography.

I will spare you the details but a friendship developed and now I am her "man Friday", assisting at weddings and strategizing on the business side of things.

It was always nice to see a few of my images mixed among hers, but this year things have changed, Stacey sent me a link to a slideshow of a recent wedding and I was (pleasantly) surprised to see how many of my images were in it, I even emailed her asking if she made the slideshow for me or for the bride.

Then another slideshow and the same thing, followed by a shout out and images on her blog.

It's not that I think my photography is "all that and a bag of chips", but it brings a smile to my face to think that Tiger Woods likes the way I putt.

Thank you Stacey.


No BS Photo Success...


If you are like me (no, not fat and old), you're always looking for resources and educational opportunities to improve yourself and hone your skills.

No BS Photo Success is just such a resource. It's run by Rob Provencher and James Hodgins, a couple of irreverent photographers (which is a good thing) who love to teach and are extremely knowledgeable about (and good at) their craft.

You can read hundreds of articles, watch almost 80 video tutorials on lighting techniques, work flow, and Photoshop tutorials, signup for their newsletter, and browse through many photography resources, all for free.

One of the things I really like is they are big into low cost, no cost, and DIY photography projects.

Chances are good that once you have worked through all of their free stuff you'll sign up for their subscription based forums.

Just to give you an idea of what they offer, and to make you hungry for more, here is one of their instructional lighting videos - shooting a one light portrait.


Get ready to be impressed...

On occasion I post the work of photographers that are on the cutting edge, photographers that seem to be light years ahead of everybody else.

It's time to add another set of names to that list - Jaco & Daleen Fourie.

Here is a video of one of their "trash the dress" sessions, once you've watched it you will surely want more so be sure to check out their blog and their website.

Grab your camera, strap yourself into your chair, and ENJOY!

(video does not come through on feeds so subscribers will need to stop by the blog to view it)

MpixPro review...

I don't make a habit of posting on the weekend (or posting consecutive product reviews) but I received a package yesterday afternoon and I really did not want to wait to share the contents.

This past Monday I joined MpixPro and though short, it has been pretty darn impressive ride so far.

As photographers I don't think we can have too many good resources and many photographers that have my respect are members of MpixPro already so I thought I would give them a try.

I submitted my application for membership on Monday morning and was approved later that same day. Once approved you upload 5 test images that MpixPro will print as 8x10's and ship out for next day delivery, all for free. I uploaded my images Wednesday, received an email Thursday letting me know that the printing was completed and that my package was being shipped that day, arriving on my porch Friday.

The purpose of the five uploaded images is for monitor calibration testing, to make sure what they print matches what you see on your monitor (as they do not offer color correction so the quality of the print is directly dependant on your monitor being properly calibrated).

To make sure I got a good sampling of their printing abilities I sent black & white images, color images, action, and still life.

Every print they sent me was outstanding.

Along with my five 8x10 images my package included a catalog of all the product MpixPro offers as well as a sample of all the papers they print on.

I did not become an MpixPro member so I could review them on Weekly Photo Tips, but my experience has started out so well and the quality of the prints they sent so good, I really wanted to share it with other photographers.

Membership is free, so you have nothing to lose and outstanding quality to gain.

You can see an introduction to MpixPro here, and over 20 videos on how MpixPro works and the products they offer here.

California Sunbounce Pro review...


If you shoot with reflectors please stop what you're doing, pull up a chair, and let me show you something way cool.

If you have ever shoot with a reflector outside in even the slightest of breezes you know just how difficult it is to put light on your subject because of the reflector bending and twisting in the wind.

And the larger the reflector the more bending, twisting, and difficult it becomes.

I recently got a California Sunbounce Pro and started being impressed as soon as I opened the box. When I unpacked (and assembled) my Sunbounce I was immediately taken with the quality of the materials and the design.

The frame is made of high strength aluminum tubing and can easily and quickly be put put together and taken apart, when disassembled it fits nicely into a small tripod size carrying bag for easy portability.

The day my package arrived it was (luckily enough) a breezy day and of course I had to assemble it and head right out doors, it was like I was pointing a flashlight (not fighting a kite in the wind) as I was easily able to put my light on a subject and just as important, keep it there. I was also impressed with the amount of light I could throw (which included throwing enough light inside the house to light up a subject standing 10 feet away from the window).

Two weeks ago I was shooting a wedding with Chris Riley in (Beautiful) Jackson New Hampshire and one place brides want their picture taken is in the old covered bridge (known as "Honeymoon Bridge").

The problem is that inside the bridge is dark, the further into the bridge you go, the darker it is.

As Chris and I were discussing how to address the (lack of ) lighting (we were considering setting up a couple speedlights) I remembered I brought my California Sunbounce and suggested we give it a try.

As you can see by the sample images, our subjects were standing pretty deep inside the bridge yet the Sunbounce had no problem throwing light on them.

In each set of images the exposure for the before and after image was exactly the same, the only difference is the light being thrown on them by my Sunbounce.

My Sunbounce Pro is all that AND a bag a chips, and once I finish this post will be ordering a Sunbounce Mini.

You can view each image larger and in a new window by clicking on it.


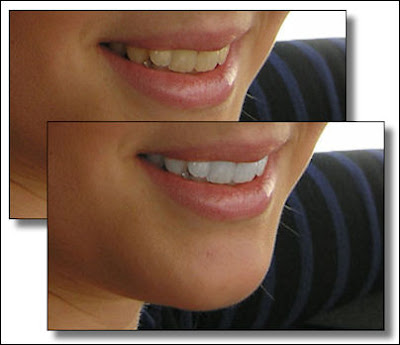
Teeth whitening with Photoshop CS4...

I recently came across a new site (to me) called TutorialBoard.net which is dedicated to "high quality tutorials for graphics design, motion graphics and visual effects artists" and they are true to their word. Great content, great tutorials.

One tutorial that we as photographers will find useful is "Whiten teeth to improve a smile in Photoshop CS4".

It is not uncommon for teeth (and eyes) to appear darker in an image than they actually are in real life and if we want to give our clients the best possible product we need to correct this problem, this tutorial makes the task quick and easy.

But sadly for those with older versions of Photoshop, this tutorial is specific to Photoshop CS4.

Live webinar with David Ziser...

Tomorrow night (Wednesday 8/18) David Ziser will be presenting "Let My Light Shine On".

David will be discussing how to light outdoor wedding photography, but the presentation is really applicable to any outdoor photography (not just weddings).

The major points of the webinar will cover:

1. Lighting Using Off-Camera Flash
2. Exposure Made Easy
3. Adding Dramatic Lighting Effects
4. Changing Up The Background
5. Making Your Subjects Look Beautiful

He had me at number one, because the best thing you can do for your images is getting the flash off your camera.

And not only will you get the webinar, you will also get to download the entire presentation for future reference and re-listening.

The day after the webinar you can purchase the download for "Let My Light Shine On" but it will cost you $39, so even if you can't attend Wednesday night you can signup, download it the next day and save yourself $10!

In this economy photographers need to "be smart" with our educational dollars and this is a low cost high return opportunity.

Hope to "see" you there.

An interview with Lou Jones...


Last week I reviewed the latest book from Lou Jones "Speedlights & Speedlites" and today Ibarionex Perello of The Candid Frame posted a recent interview he did with Lou.

It's enjoyable to learn more about a person who's work you like and if you are a Lou Jones fan this is a great chance to learn more about the man behind the camera.

I have mentioned The Candid Frame in previous posts, you can listen to in-depth conversations (45-60 minutes) with iconic photographers twice a month and you should really add The Candid Frame to your podcast list.

The interesting story behind the image with the guitars is that neither of them could play.

;)

And the architectural image was taken at the State house in Boston, if you are ever in the area it is a fun place to shoot, it has a ton of cool architectural details including stained glass, marble columns & stairs, paintings, and much more that could keep you shooting for some time.

When a bad photograph really isn't...

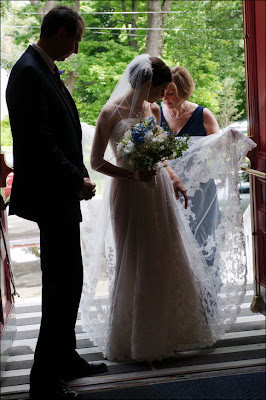
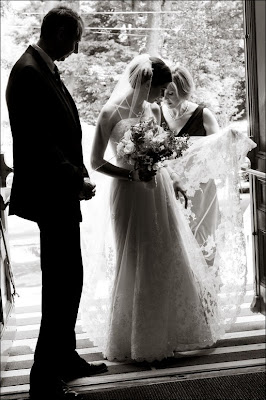
Here are two images that if you look at them as they downloaded off the memory card are not all that impressive, but I knew that before I ever hit the shutter release.

Both were taken in non-ideal situations and I had to figure out what I had to work with at that moment and what I could do in post-processing.

In the first image the bride is standing in the doorway of the church with her dad while mom is behind her adjusting her dress. It's one of those shots that you don't have too much time to think about and certainly no time to fiddle with equipment or the moment will be gone as quickly as it came.

I am standing in a dark entryway facing the door, I can't use a flash to light her, and it is a bright sunny day outside (behind her). If I adjust the exposure for the bride that background is waaay blown out, and if I compensate too much for the outside I will end up with a silhouette of the people, so I opted to adjust the exposure between the bride and the bright outdoors behind her.

The exposure gives me some detail in the people and I know I am going to convert it to black and white to get back even more while at the same time keep the bright background from being the focal point of the image (as it is in the original).


In the second image the couple is at the altar I was presented with several challenges, it was dark and what light we did have came from several different light sources (temperatures) making it difficult to get a correct white balance.

To get the shot (without using flash) I jacked up the ISO, but this added noise to my bad white balance, so things are getting worse, not better.

Black and white to the rescue again, it gave me back more details, overcomes the bad white balance, and the noise simply makes it look like an "old time" black and white.

Noise can be much more easily overcome (or explained away) in black in white than it can in color.

Are they "perfect" images? No, far from it, but it can still end up being a treasured memory for the client.


(click on either image to view larger and in a new window)

More maternity portraits...

Is there anything more beautiful than a women "with child"?

Here are a couple shots I (really) like from yet another maternity shoot this week.

I think the shot below is extremely elegant, but you wouldn't if you saw it being shot.

My wife (who often assists me) and Sam's husband were standing behind her pulling on the material for all they were worth while poor Sam struggled valiantly just to stay upright. But the results were well worth it.

I used the same three light setup as I did for another recently posted maternity session and I will post the video of the setup the beginning of next week.

Feel free to click on either image to view larger and in a new window.

Speedlights & Speedlites, a great new book...

A new book has hit the bookshelves, "Speedlights & Speedlites: Creative Flash Photography at the Speed of Light" by Lou Jones, Bob Keenan, and Stephen Ostrowski and it's a must read.

It is a book dedicated to small strobes, specifically Nikon AND Canon flashes.

It has some very cool features, first there are only two chapters in the book, chapter one is "One Light" (25 one light setups) and chapter two is (you may have already guessed) "Two Lights" (20 two light setups), each image is accompanied with the "inspiration, how's, and whys" of the shot and a complete lighting diagram.

To make it as simple as possible to follow along the book is even color coded (Nikon - purple, Canon - green) so you can quickly and easily determine if the discussion is about a Nikon Speedlight or a Canon Speedlite.

Sandwiched in between each of the images are one and two page educational segments that start with the fundamentals of flash, inverse square law, mastering distance, characteristics of light, comprehending the direction of bounce flash, and so much more.

The authors also cover mixing speedlights with studio strobes.

This book is for all levels of photographers and the images cover just about anything you might ever want to photograph, still life, portraiture, corporate, commercial, architectural, and sports.

We learn to talk by listening to others, we learn to walk by watching others, and "Speedlights & Speedlites" is a great educational opportunity for those who want to "walk & talk" small strobes.

I could ramble on, but these pictures will give you a better idea than my words ever could, so below are sample pages of the image, the description, an educational segment, and the setup/diagram.

Click on any of the images to view larger and in a new window.


Important moments in other peoples lives...


One of the (many) things I love about being a photographer is "sitting in" on the lives of other people.

We have the pleasure of watching people come together and to grow.

It's reinforcement that you must be doing a good job if clients keep coming back to you, but more importantly it is an honor for us as photographers to be included in the most important moments of their lives.

Jen & Joe are just such a couple for me. I have photographed their engagement, their wedding, and now the pregnancy of their first child (and soon a newborn session).

Here are a few shots from their maternity session.

Come back in about a week and I will have a video showing how I setup the lighting using three Nikon SB-800's.

See if you can "deconstruct" how the lighting was done, a hint, each of the three lights had a different (but commonly used) light modifier.

(click on any of the images to view larger and in a new window)


It is with sadness...


I learned Friday that DTown TV has posted their final episode.

For the last 6 months we have gotten an information filled episode every single week, but that has come to an end.

Two good things though (that "silver lining" folks talk about):

1. All 24 episodes are still available online.

2. In 1 month Scott and Matt will be back with a new show.

If you shoot Nikon you really do need to go and watch these episodes while they are still available.

They're short (12-14 minutes in length) but packed with useful tips and tricks. I have watched all 24 and can honestly say that I have learned something (usually several something's) from each and every one.

Though disappointed that the show has ended, I am looking forward to what they bring to the table next.

Nikon Guide to Creative Lighting Review...

Let me say right up front, even if you do not shoot Nikon you should still read this review (and watch the DVD), because light is light and most of this DVD is about light and how we as photographers can control and shape it.

Though if you don't use Nikon Speedlights watching the DVD may have you rethinking that position.

But before I get into the review let me explain why I am a big fan of instructional DVD's.

1. It is an inexpensive educational opportunity (this DVD can be had for under $30).

2. You can watch (and re-watch it) at a time that is convenient to you.

3. You can pause it and try what is being presented right then and there (as apposed to having to wait until you get home from a live event, hoping you remember it).

4. When you have sucked every bit of information out of the DVD you can give it to a friend or sell it on eBay and recover a good part of your investment.

Now, for the review.

In the "Hands-on Guide to Creative Lighting DVD" we get to spend just over 2 1/2 hours with Bob Krist and Joe McNally talking about the principles of light, light quality and how they interplay with the things we like to photograph most, landscapes and people.

The first 45 minutes (section 1) is spent explaining what light is, how it works, and why we want to be thinking about light AND shadows when we are setting up a photograph.

Bob goes into photographing in natural light, using Speedlights to supplement natural light, and shooting with Speedlights alone.

He explains normal sync speed, high-speed sync, and slow (front curtain) sync.

Bob then takes us into his studio and starts a portrait session using a single flash and methodically building up to a 3 Speedlight setup using umbrellas and reflectors.

Each scenario is accompanied with before & after images, diagrams, and equipment lists just to make sure we didn't miss a thing.

Section 2 is dedicated to Nikon folks as it is detailed operating instructions for the SB-600, SB-800, and SB-900 Speedlights. How to set them up as commanders, as slaves, using them in conjunction with built in Nikon camera flashes, and with the SU-800 command module.

They cover all of the features in-depth and you will certainly what to watch this section several times.

I have always been extremely happy with my SB-800's and had never really given much thought to upgrading to the Mac-daddy SB-900, but after seeing how well (and easy) it is to have complete control of all the other flashes from a single point I am seriously reconsidering my options (which petty much consists of grabbing a shopping cart and scouring the streets for returnable bottles and cans).

Section 3 was my favorite part of the DVD, it is Joe McNally (with Bob as his assistant) shooting in several different (difficult) locations, from dark dance studios to harsh mid-day sun on the water and how we as photographers can overcome these conditions and bend light to our will (almost sounds like a super here, huh?).

Joe will take a single shot of the subject without a flash so we can all see what it looks like and then slowly builds from there. Adding one light, taking the shot, evaluating the shot, and continuing to build until problems have been overcome and he has light and shadow exactly where he wants them.

It's a great learning process, starting with nothing and building an outstanding image, all done in a manner that anyone can follow and emulate.

We also get to watch Joe interact with the client, this was as much of an educational opportunity as watching him build with light.

The DVD ends with Joe and Bob going over images from the different shoots, evaluating the photographs and discussing how they overcame the challenges of location lighting.

If I had to say one thing I didn't like about the DVD it would be... ah... well... NOTHING.

It starts with the very basics so that newcomers to photography can follow along and builds into 4 and 5 light (stunning) portraits, and at no point would the beginner be lost or the experienced photographer be bored.

Hands-on Guide to Creative Lighting DVD is money and time very will spent.

(if you are a subscriber and can't see the video, come by the blog and check out the trailer for this DVD)


Why shoot tethered?

I had a few folks email asking why one would shoot tethered, what's the benefit?

Here are (just) a few reasons:

1. Size does matter, a bigger screen will allow you a much better look at your image (exposure, focus point, depth of field, and color). Have you ever looked at an image on the back of your camera only to download it later and wonder if it was taken by Stevie Wonder because you can't find one area in sharp focus?

It will also help you find small imperfections that you just can't see on that 2 inch screen on the back of your camera.

2. It is not uncommon to have a commercial client or a mom in the studio while I'm shooting and they are hovering very close over my shoulder (well within my personal bubble) because they want to see what the image looks like. Shooting tethered will allow them to see the image on my monitor and I don't have to wear them like a backpack.

Getting immediate feedback from a commercial client is a HUGE time saver, you aren't going back and forth with images in an attempt to confirm you are (or are not) capturing their "vision".

3. There are times that I have shot with the camera at such an angle that it was hard for me to see the screen on the back of my camera and shooting tethered gave me a much better (and safer) view/perspective of the shot.

4. Shooting tethered can save you time and speedup your workflow, as the images are being downloaded right to your computer, you won't have to download the cards later.

5. Some folks will run an auto backup when they shoot tethered, so not only are the images downloaded, they are also immediately backed up.

Another great idea long the "tethered" lines was a suggestion I picked up from David Tejada, get a portable DVD player and hook it to the leg of your tripod. It will give you many of the same advantages of shooting tethered, can easily be taken anywhere a tripod can go, and cost you under $100.

Shooting tethered with Nikon, Canon, Windows, & Mac...

There are quite a few (different) resources out there for shooting tethered and I thought I would combine them all here in one spot for easy reference.

If you shoot Canon it's really pretty simply, you can use the FREE EOS utility for shooting tethered (Windows manual here, Mac manual here).

My friend Jason Anderson over at Canon Blogger has a well done tutorial on Shooting Tethered with Canon Gear that you should check out.

It's not quite so simple for us Nikon folks.

Nikon shooters can use Camera Control Pro, but it's not free (though you can download a free 30 day trial here), so let's explore a few free options.

StudioTether is a free application that (as the name implies) will allow you to tether your Nikon camera to your Mac (no Windows version is available).

A free Windows option is from DiyPhotoBits.com, they offer a free tethered shooting script for Nikon Cameras (Windows only), you can get the latest version here.

Another Mac tethered option for Nikon shooters is Sofortbild, and it too is free. Keep an eye on their blog for announcements and updates.

And finally, if you want to check out Joe McNally's rig for shooting tethered check it out here.

Newborn Portraiture...

Here are some images from a recent newborn session.

The lighting was simple, a single Nikon SB-800 in a 24" x 24" softbox, set to 1/16th power and triggered by a pocket wizard.

While we were shooting the baby started to cry and the family dog become concerned and just had to check on her, which is my segue to the following tip:

When shooting certain situations (like babies and weddings) it's a good idea to keep the camera close to your face because things can happen quickly (a yawn or a dog checking on its baby) and if you have the camera at your side you just won't be able to get it to your eye quick enough.